Introduction
React is a library for creating web and native user interfaces. React lets you build user interfaces out of individual pieces called components. React has a huge ecosystem of third-party packages that extend its capabilities.
This page will give you an introduction to the 80% of React concepts that you will use on a daily basis.
Creating and nesting components
React apps are made out of components. A component is a piece of the UI (user interface) that has its own logic and appearance. A component can be as small as a button, or as large as an entire page.
React components are JavaScript functions that return markup:
function MyButton() {
  return <button>I'm a button</button>;
}
Now that you’ve declared MyButton, you can nest it into another component:
export default function MyApp() {
  return (
    <div>
      <h1>Welcome to my app</h1>
      <MyButton />
    </div>
  );
}
Notice that <MyButton /> starts with a capital letter.
That’s how you know it’s a React component.
React component names must always start with a capital letter, while HTML tags must be lowercase.
The export default keywords specify the main component in the file.
Writing markup with JSX
The markup syntax you’ve seen above is called JSX. It is optional, but most React projects use JSX for its convenience. All of the tools the React docs recommend for local development support JSX out of the box.
JSX is stricter than HTML. You have to close tags like <br />.
Your component also can’t return multiple JSX tags. You have to wrap them into a shared parent, like a <div>...</div> or an empty <>...</> wrapper:
function AboutPage() {
  return (
    <>
      <h1>About</h1>
      <p>
        Hello there.
        <br />
        How do you do?
      </p>
    </>
  );
}
Embedding expressions in JSX
In the example below, we declare a variable called name and then use it inside JSX by wrapping it in curly braces:
const name = "Josh Perez";
const element = <h1>Hello, {name}</h1>;

ReactDOM.render(element, document.getElementById("root"));
You can put any valid JavaScript expression inside the curly braces in JSX.
JSX is an expression too
After compilation, JSX expressions become regular JavaScript function calls and evaluate to JavaScript objects.
This means that you can use JSX inside of if statements and for loops, assign it to variables, accept it as arguments, and return it from functions:
function getGreeting(user) {
  if (user) {
    return <h1>Hello, {formatName(user)}!</h1>;
  }
  return <h1>Hello, Stranger.</h1>;
}
Specifying attributes with JSX
You may use quotes to specify string literals as attributes:
const element = <div tabIndex="0"></div>;
You may also use curly braces to embed a JavaScript expression in an attribute:
const element = <img src={user.avatarUrl}></img>;
Don’t put quotes around curly braces when embedding a JavaScript expression in an attribute. You should either use quotes (for string values) or curly braces (for expressions), but not both in the same attribute.
Since JSX is closer to JavaScript than to HTML, React DOM uses camelCase property naming convention instead of HTML attribute names.
For example, class becomes className in JSX, and tabindex becomes tabIndex.
Specifying children with JSX
If a tag is empty, you may close it immediately with />, like XML:
const element = <img src={user.avatarUrl} />;
JSX tags may contain children:
const element = (
  <div>
    <h1>Hello!</h1>
    <h2>Good to see you here.</h2>
  </div>
);
JSX prevents injection attacks
It is safe to embed user input in JSX:
const title = response.potentiallyMaliciousInput;
// This is safe:
const element = <h1>{title}</h1>;
By default, React DOM escapes any values embedded in JSX before rendering them. Thus it ensures that you can never inject anything that’s not explicitly written in your application. Everything is converted to a string before being rendered. This helps prevent XSS (cross-site-scripting) attacks.
JSX represents objects
Babel compiles JSX down to React.createElement() calls. These two examples are identical:
const element = <h1 className="greeting">Hello, world!</h1>;
const element = React.createElement(
  "h1",
  { className: "greeting" },
  "Hello, world!"
);
React.createElement() performs a few checks to help you write bug-free code but essentially it creates an object like this:
// Note: this structure is simplified
const element = {
  type: "h1",
  props: {
    className: "greeting",
    children: "Hello, world!",
  },
};
These objects are called "React elements". You can think of them as descriptions of what you want to see on the screen. React reads these objects and uses them to construct the DOM and keep it up to date.
It is recommended to use the "Babel" language definition for your editor of choice so that both ES6 and JSX code is properly highlighted.
Adding styles
In React, you specify a CSS class with className. It works the same way as the HTML class attribute:
<img className="avatar" />
Then you write the CSS rules for it in a separate CSS file:
.avatar {
  border-radius: 50%;
}
React does not prescribe how you add CSS files. In the simplest case, you’ll add a <link> tag to your HTML. If you use a build tool or a framework, consult its documentation to learn how to add a CSS file to your project.
Conditional rendering
In React, there is no special syntax for writing conditions. Instead, you’ll use the same techniques as you use when writing regular JavaScript code. For example, you can use an if statement to conditionally include JSX:
<div>{isLoggedIn ? <AdminPanel /> : <LoginForm />}</div>
When you don’t need the else branch, you can also use a shorter logical && syntax:
<div>{isLoggedIn && <AdminPanel />}</div>
All of these approaches also work for conditionally specifying attributes.
Rendering lists
You will rely on JavaScript features like for loop and the array map() function to render lists of components.
For example, let’s say you have an array of products:
const products = [
  { title: "Cabbage", id: 1 },
  { title: "Garlic", id: 2 },
  { title: "Apple", id: 3 },
];
Inside your component, use the map() function to transform an array of products into an array of <li> items:
const listItems = products.map((product) => (
  <li key={product.id}>{product.title}</li>
));

return <ul>{listItems}</ul>;
Notice how <li> has a key attribute. For each item in a list, you should pass a string or a number that uniquely identifies that item among its siblings. Usually, a key should be coming from your data, such as a database ID. React uses your keys to know what happened if you later insert, delete, or reorder the items.
Responding to events
You can respond to events by declaring event handler functions inside your components:
function MyButton() {
  function handleClick() {
    alert("You clicked me!");
  }

  return <button onClick={handleClick}>Click me</button>;
}
Notice how onClick={handleClick} has no parentheses at the end! Do not call the event handler function: you only need to pass it down. React will call your event handler when the user clicks the button.
Updating the screen
Often, you’ll want your component to “remember” some information and display it. For example, maybe you want to count the number of times a button is clicked. To do this, add state to your component.
First, import useState from React:
import { useState } from "react";
Now you can declare a state variable inside your component:
function MyButton() {
  const [count, setCount] = useState(0);
  // ...
You’ll get two things from useState: the current state (count), and the function that lets you update it (setCount). You can give them any names, but the convention is to write [something, setSomething].
The first time the button is displayed, count will be 0 because you passed 0 to useState(). When you want to change state, call setCount() and pass the new value to it. Clicking this button will increment the counter:
function MyButton() {
  const [count, setCount] = useState(0);

  function handleClick() {
    setCount(count + 1);
  }

  return <button onClick={handleClick}>Clicked {count} times</button>;
}
If you render the same component multiple times, each will get its own state.
Using Hooks
Functions starting with use are called Hooks. useState is a built-in Hook provided by React. You can find other built-in Hooks in the API reference. You can also write your own Hooks by combining the existing ones.
Hooks are more restrictive than other functions. You can only call Hooks at the top of your components (or other Hooks). If you want to use useState in a condition or a loop, extract a new component and put it there.
Sharing data between components
Let's consider an example with 2 Buttons which both have their independent count, and when each button is clicked, only the count for the button clicked changes:
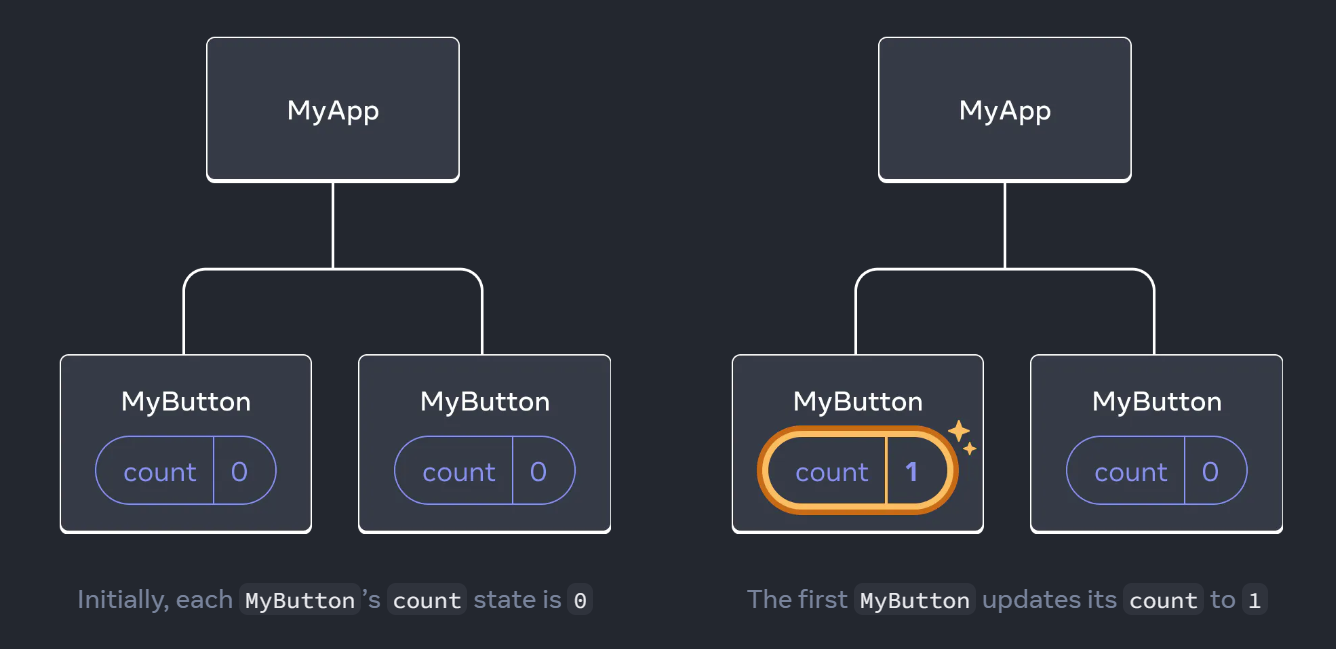
However, often you’ll need components to share data and always update together. To make both MyButton components display the same count and update together, you need to move the state from the individual buttons “upwards” to the closest component containing all of them.
In this example, it is MyApp:
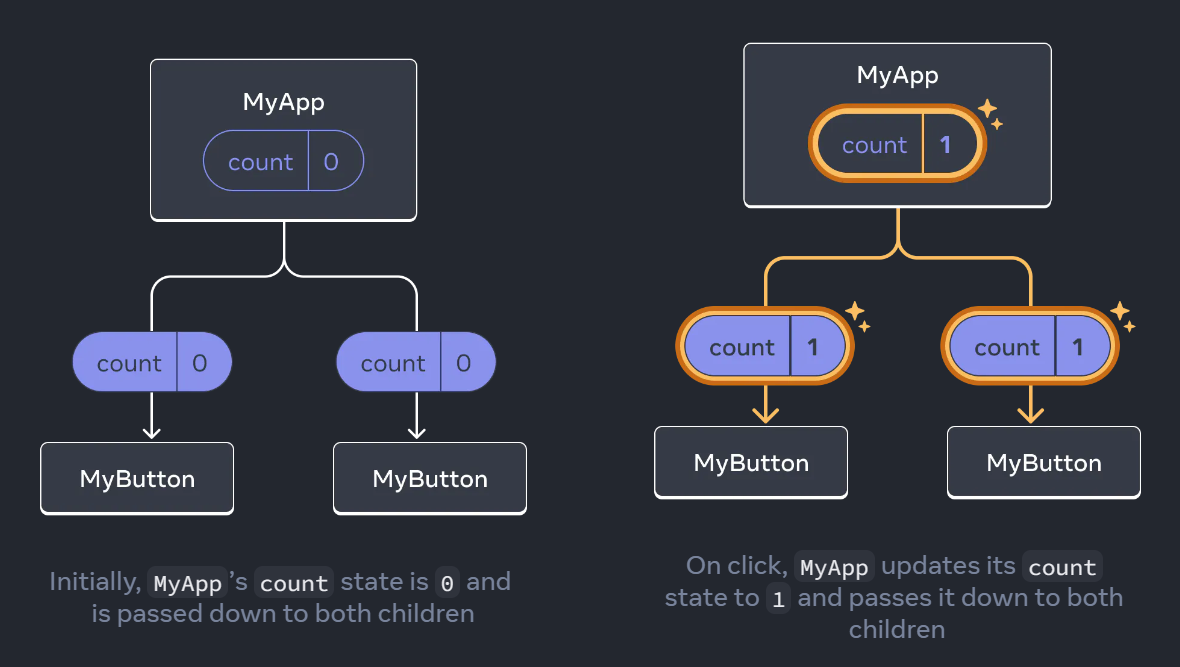
Now when you click either button, the count in MyApp will change, which will change both of the counts in MyButton. Here’s how you can express this in code. First, move the state up from MyButton into MyApp:
export default function MyApp() {
  const [count, setCount] = useState(0);

  function handleClick() {
    setCount(count + 1);
  }

  return (
    <div>
      <h1>Counters that update separately</h1>
      <MyButton />
      <MyButton />
    </div>
  );
}

function MyButton() {
  // ... we're moving code from here ...
}
Then, pass the state down from MyApp to each MyButton, together with the shared click handler. You can pass information to MyButton using the JSX curly braces, just like you previously did with built-in tags like <img>:
export default function MyApp() {
  const [count, setCount] = useState(0);

  function handleClick() {
    setCount(count + 1);
  }

  return (
    <div>
      <h1>Counters that update together</h1>
      <MyButton count={count} onClick={handleClick} />
      <MyButton count={count} onClick={handleClick} />
    </div>
  );
}
The information you pass down like this is called props. Now the MyApp component contains the count state and the handleClick event handler, and passes both of them down as props to each of the buttons.
Finally, change MyButton to read the props you have passed from its parent component:
function MyButton({ count, onClick }) {
  return (
    <button onClick={onClick}>
      Clicked {count} times
    </button>
  );
}
When you click the button, the onClick handler fires. Each button’s onClick prop was set to the handleClick function inside MyApp, so the code inside of it runs. That code calls setCount(count + 1), incrementing the count state variable. The new count value is passed as a prop to each button, so they all show the new value. This is called “lifting state up”. By moving state up, you’ve shared it between components.