Jekyll
Jekyll is a simple, extendable, static site generator. Given text written in a supported markup language it churns through layouts to create a static website. Throughout that process you can tweak how you want the site URLs to look, what data gets displayed in the layout, and more.
Creating a new project
jekyll new <sitename>
Building a site
bundle exec jekyll serve
Site will be served to localhost. Site will be rebuild upon changes.
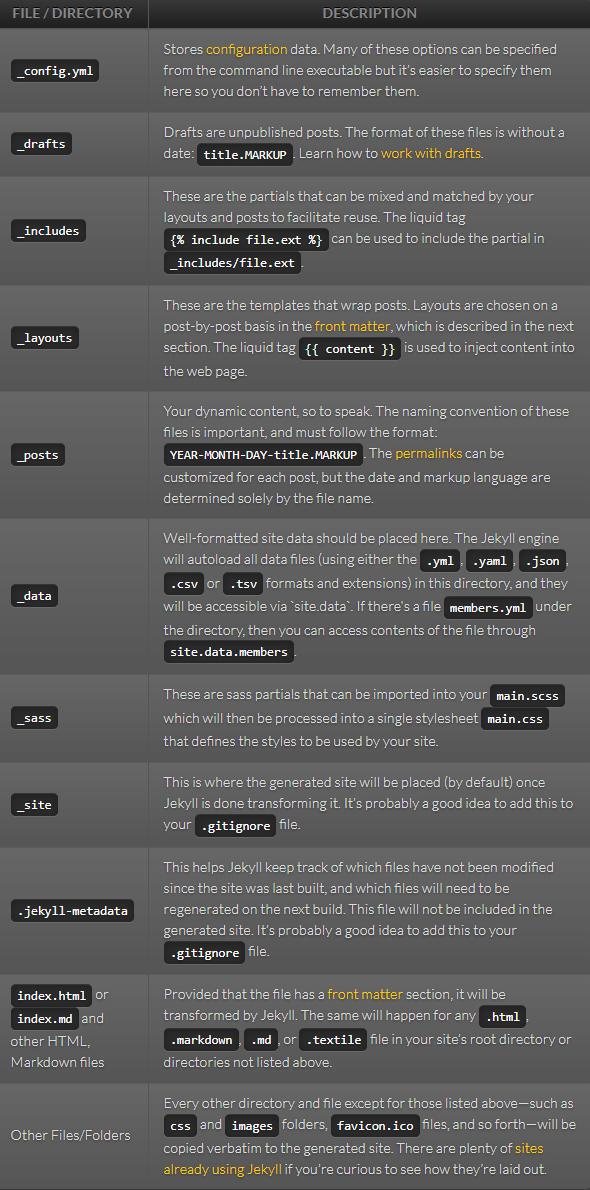
1. Directory Structure
A basic Jekyll site usually looks something like this:

What each of these does:
No database
One of the great things about Jekyll is there’s no database. All content and site structure are files which a Git repository can version.
2. Liquid
Liquid is where Jekyll starts to get more interesting. Liquid is a templating language which has three main parts:
Objects
Objects tell Liquid where to output content. They're denoted by double curly braces: {{ and }}. For example:
{{ page.title }}
Outputs a variable called page.title on the page.
Tags
Tags create the logic and control flow for templates. They are denoted by curly braces and percent signs: {% and %}. For example:
{% if page.show_sidebar %}
  <div class="sidebar">
    sidebar content
  </div>
{% endif %}
Outputs the sidebar if page.show_sidebar is true. Available Tags
Filters
Filters change the output of a Liquid object. They are used within an output and are separated by a |. For example:
{{ "hi" | capitalize }}
Outputs Hi. More Information
Small example of using Liquid
In an html file we could use:
...
<h1>{{ "Hello World!" | downcase }}</h1>
...
To get our changes processed by Jekyll we need to add front matter to the top of the page:
---
# the 3 dashes (front matter) tell Jekyll to process Liquid
---
The "Hello World!" will now be downcased on render.
3. Front Matter
Front matter is a snippet of YAML which sits between two triple-dashed lines at the top of a file. Front matter is used to set variables for the page, for example:
---
my_number: 5
---
Front matter variables are available in Liquid under the page variable. For example to output the variable above you would use:
{{ page.my_number }}
4. Layouts
Websites typically have more than one page. Jekyll supports Markdown as well as HTML for pages.
Markdown is a great choice for pages with a simple content structure (just paragraphs, headings and images), as it’s less verbose than raw HTML.
Let’s say you wanted to add a stylesheet to your site, you would have to go to each page and add it to the <head>. It might not sound so bad for a two page site, imagine doing it for 100 pages. Even simple changes will take a long time to make.
Creating a layout
Using a layout is a much better choice. Layouts are templates that wrap around your content. They live in a directory called _layouts.
Example layout:
<!DOCTYPE html>
<html>
  <head>
    <meta charset="utf-8" />
    <title>{{ page.title }}</title>
  </head>
  <body>
    {{ content }}
  </body>
</html>
The content of the page is replaced with a content variable. content is a special variable which has the value of the rendered content of the page it’s called on.
To have index.html use this layout, you can set a layout variable in front matter. The layout wraps around the content of the page so all you need in index.html is:
---
layout: default
title: Home
---
<h1>{{ "Hello World!" | downcase }}</h1>
Note that you can access the page front matter from the layout. In this case title is set in the index page’s front matter but is output in the layout.
5. Includes
Navigation should be on every page so adding it to your layout is the correct place to do this. Instead of adding it directly to the layout, let’s use this as an opportunity to learn about includes.
Include tag
The include tag allows you to include content from another file stored in an _includes folder. Includes are useful for having a single source for source code that repeats around the site or for improving the readability.
Navigation source code can get complex so sometimes it’s nice to move it into an include.
Include usage
Example for the navigation file '_includes/navigation.html':
<nav>
  <a href="/">Home</a>
  <a href="/about.html">About</a>
</nav>
Adding the navigation to _layouts/default.html:
<!DOCTYPE html>
<html>
  <head>
    <meta charset="utf-8" />
    <title>{{ page.title }}</title>
  </head>
  <body>
    {% include navigation.html %} {{ content }}
  </body>
</html>
Current page highlighting
To highlight the current page in the navigation, _includes/navigation.html needs to know the URL of the page it’s inserted into so it can add styling. Jekyll has useful variables available one of which is page.url.
Using page.url you can check if each link is the current page and color it red if true:
<nav>
  <a href="/" {% if page.url == "/" %}style="color: red;"{% endif %}>
    Home
  </a>
  <a href="/about.html" {% if page.url == "/about.html" %}style="color: red;"{% endif %}>
    About
  </a>
</nav>
6. Data Files
Jekyll supports loading data from YAML, JSON, and CSV files located in a _data directory. Data files are a great way to separate content from source code to make the site easier to maintain.
Data file usage
Let's demonstrate the usage of a data file by using it to store the contents of the site navigation and then iterate over it in the navigation include.
YAML is a format that’s common in the Ruby ecosystem. We’ll use it to store an array of navigation items each with a name and link.
The data file looks like this:
- name: Home
  link: /
- name: About
  link: /about.html
Jekyll makes this data file available to you at site.data.navigation. Instead of outputting each link in _includes/navigation.html, now you can iterate over the data file instead:
<nav>
  {% for item in site.data.navigation %}
    <a href="{{ item.link }}" {% if page.url == item.link %}style="color: red;"{% endif %}>
      {{ item.name }}
    </a>
  {% endfor %}
</nav>
This makes it much easier to add new items to the navigation.
7. Assets
Using CSS, JS, images and other assets is straightforward with Jekyll. Place them in your site folder and they’ll copy across to the built site.
Jekyll sites often use this structure to keep assets organized:
- assets
- css
- images
- js
Sass
We can style the content of our html with a class like this:
<nav>
{% for item in site.data.navigation %}
<a href="{{ item.link }}" {% if page.url == item.link %}class="current"{% endif %}>{{ item.name }}</a>
{% endfor %}
</nav>
We could use a standard css file but Jekyll also supports Sass. Sass is a fantastic extension to CSS baked right into Jekyll.
Example sass file under /assets/css/styles.scss:
---
---

@import "main";
The empty front matter at the top tells Jekyll it needs to process the file. The @import "main" tells Sass to look for a file called main.scss in the sass directory (_sass/ by default which is directly under root folder of your website).
For larger projects, this is a great way to keep your CSS organized. We create a Sass file at /_sass/main.scss with the following content:
.current {
  color: green;
}
We’ll need to reference the stylesheet in our layout.
We add the stylesheet to the <head> of _layouts/default.html:
<!DOCTYPE html>
<html>
  <head>
    <meta charset="utf-8" />
    <title>{{ page.title }}</title>
    <link rel="stylesheet" href="/assets/css/styles.css" />
  </head>
  <body>
    {% include navigation.html %} {{ content }}
  </body>
</html>
8. Blogging
In true Jekyll style, blogging is powered by text files only.
Posts
Blog posts live in a folder called _posts. The filename for posts have a special format: the publish date, then a title, followed by an extension.
An example of a post looks like this:
---
layout: post
author: jill
---
A banana is an edible fruit – botanically a berry – produced by several kinds
of large herbaceous flowering plants in the genus Musa.

In some countries, bananas used for cooking may be called "plantains",
distinguishing them from dessert bananas. The fruit is variable in size, color,
and firmness, but is usually elongated and curved, with soft flesh rich in
starch covered with a rind, which may be green, yellow, red, purple, or brown
when ripe.
This is like the about.md you created before except it has an author and a different layout. author is a custom variable, it’s not required and could have been named something like creator.
Layout
We'll create the post layout at _layouts/post.html with the following content:
---
layout: default
---
<h1>{{ page.title }}</h1>
<p>{{ page.date | date_to_string }} - {{ page.author }}</p>

{{ content }}
This is an example of layout inheritance. The post layout outputs the title, date, author and content body which is wrapped by the default layout.
Also note the date_to_string filter, this formats a date into a nicer format.
List posts
There’s currently no way to navigate to the blog post. Typically a blog has a page which lists all the posts. Jekyll makes posts available at site.posts.
We create blog.html in your root (/blog.html) with the following content:
---
layout: default
title: Blog
---

<h1>Latest Posts</h1>

<ul>
  {% for post in site.posts %}
  <li>
    <h2><a href="{{ post.url }}">{{ post.title }}</a></h2>
    <p>{{ post.excerpt }}</p>
  </li>
  {% endfor %}
</ul>
There’s a few things to note with this code:
post.urlis automatically set by Jekyll to the output path of the postpost.titleis pulled from the post filename and can be overridden by settingtitlein front matterpost.excerptis the first paragraph of content by default
We'll also need a way to navigate to this page through the main navigation. We add an entry for the blog page in _data/navigation.yml:
- name: Home
  link: /
- name: About
  link: /about.html
- name: Blog
  link: /blog.html
More posts
Now we can add additional posts to _posts and they will show up on the blog page.
9. Collections
Collections are similar to posts except the content doesn’t have to be grouped by date.
Configuration
To set up a collection we'll need to tell Jekyll about it. Jekyll configuration happens in a file called _config.yml (by default).
To reload the configuration we'll need to restart the server by terminating and re-executing jekyll serve.
Add authors
Documents (the items in a collection) live in a folder in the root of the site named _*collection_name*. In this case, _authors.
We can add authors to this collection by creating one like this (_authors/jill.md):
---
short_name: jill
name: Jill Smith
position: Chief Editor
---
Jill is an avid fruit grower based in the south of France.
Staff page
Now we'll need to add a page which lists all the authors on the site. Jekyll makes the collection available at site.authors.
We create staff.html and iterate over site.authors to output all the staff:
---
layout: default
title: Staff
---

<h1>Staff</h1>

<ul>
  {% for author in site.authors %}
  <li>
    <h2>{{ author.name }}</h2>
    <h3>{{ author.position }}</h3>
    <p>{{ author.content | markdownify }}</p>
  </li>
  {% endfor %}
</ul>
Since the content is markdown, you need to run it through the markdownify filter. This happens automatically when outputting using {{ content }} in a layout.
We also need a way to navigate to this page through the main navigation. We open _data/navigation.yml and add an entry for the staff page:
- name: Home
  link: /
- name: About
  link: /about.html
- name: Blog
  link: /blog.html
- name: Staff
  link: /staff.html
Output a page
By default, collections do not output a page for documents. In this case we want each author to have their own page so let’s tweak the collection configuration.
We open _config.yml and add output: true to the author collection configuration:
collections:
  authors:
    output: true
We can link to the output page using author.url:
---
layout: default
---

<h1>Staff</h1>

<ul>
  {% for author in site.authors %}
  <li>
    <h2><a href="{{ author.url }}">{{ author.name }}</a></h2>
    <h3>{{ author.position }}</h3>
    <p>{{ author.content | markdownify }}</p>
  </li>
  {% endfor %}
</ul>
Just like posts we’ll need to create a layout for authors. We create _layouts/author.html with the following content:
---
layout: default
---

<h1>{{ page.name }}</h1>
<h2>{{ page.position }}</h2>

{{ content }}
Front matter defaults
Now we need to configure the author documents to use the author layout. We could do this in the front matter like we have previously but that’s getting repetitive.
What we really want is all posts to automatically have the post layout, authors to have author and everything else to use the default.
We can achieve this by using front matter defaults in _config.yml. You set a scope of what the default applies to, then the default front matter you’d like.
We add defaults for layouts to our _config.yml:
collections:
  authors:
    output: true

defaults:
  - scope:
      path: ""
      type: "authors"
    values:
      layout: "author"
  - scope:
      path: ""
      type: "posts"
    values:
      layout: "post"
  - scope:
      path: ""
    values:
      layout: "default"
Now we can remove layout from the front matter of all pages and posts. Note that any time we update _config.yml you’ll need to restart Jekyll for the changes to take affect.
List author’s posts
Let’s list the posts an author has published on their page. To do this we need to match the author short_name to the post author. We use this to filter the posts by author.
We iterate over this filtered list in _layouts/author.html to output the author’s posts:
---
layout: default
---

<h1>{{ page.name }}</h1>
<h2>{{ page.position }}</h2>

{{ content }}

<h2>Posts</h2>
<ul>
  {% assign filtered_posts = site.posts | where: 'author', page.short_name %} {%
  for post in filtered_posts %}
  <li><a href="{{ post.url }}">{{ post.title }}</a></li>
  {% endfor %}
</ul>
Link to authors page
The posts have a reference to the author so let’s link it to the author’s page. We can do this using a similar filtering technique in _layouts/post.html:
---
layout: default
---

<h1>{{ page.title }}</h1>

<p>
  {{ page.date | date_to_string }} {% assign author = site.authors | where:
  'short_name', page.author | first %} {% if author %} -
  <a href="{{ author.url }}">{{ author.name }}</a>
  {% endif %}
</p>

{{ content }}
10. Deployment
In this final step we’ll get the site ready for production.
Gemfile
It’s good practice to have a Gemfile for your site. This ensures the version of Jekyll and other gems remains consistent across different environments.
We create Gemfile in the root with the following content:
source 'https://rubygems.org'

gem 'jekyll'
Then we run bundle install in the terminal. This installs the gems and creates Gemfile.lock which locks the current gem versions for a future bundle install. If we ever want to update the gem versions we can run bundle update.
When using a Gemfile, we'll run commands like jekyll serve with bundle exec prefixed. So the full command is:
bundle exec jekyll serve
This restricts our Ruby environment to only use gems set in our Gemfile.
Plugins
Jekyll plugins allow you to create custom generated content specific to your site. There’s many plugins available or you can even write your own.
There’s three official plugins which are useful on almost any Jekyll site:
- jekyll-sitemap - Creates a sitemap file to help search engines index content
- https://github.com/jekyll/jekyll-feed - Creates an RSS feed for your posts
- jekyll-seo-tag - Adds meta tags to help with SEO
To use these first we need to add them to our Gemfile. If we put them in a jekyll_plugins group they’ll automatically be required into Jekyll:
source 'https://rubygems.org'

gem 'jekyll'

group :jekyll_plugins do
  gem 'jekyll-sitemap'
  gem 'jekyll-feed'
  gem 'jekyll-seo-tag'
end
Then we add these lines to our _config.yml:
plugins:
  - jekyll-feed
  - jekyll-sitemap
  - jekyll-seo-tag
Now we install them by running a bundle update.
jekyll-sitemap doesn’t need any setup, it will create your sitemap on build.
For jekyll-feed and jekyll-seo-tag we need to add tags to _layouts/default.html:
<!DOCTYPE html>
<html>
  <head>
    <meta charset="utf-8" />
    <title>{{ page.title }}</title>
    <link rel="stylesheet" href="/assets/css/styles.css" />
    {% feed_meta %} {% seo %}
  </head>
  <body>
    {% include navigation.html %} {{ content }}
  </body>
</html>
Environments
Sometimes we might want to output something in production but not in development. Analytics scripts are the most common example of this.
To do this we can use environments. We can set the environment by using the JEKYLL_ENV environment variable when running a command. For example:
JEKYLL_ENV=production bundle exec jekyll build
By default JEKYLL_ENV is development. The JEKYLL_ENV is available in liquid using jekyll.environment. So to only output the analytics script on production we would do the following:
{% if jekyll.environment == "production" %}
  <script src="my-analytics-script.js"></script>
{% endif %}
Deployment
The final step is to get the site onto a production server. The most basic way to do this is to run a production build:
JEKYLL_ENV=production bundle exec jekyll build
And copy the contents of _site to the server.
A better way is to automate this process using a CI or 3rd party.
Variables
Jekyll traverses your site looking for files to process. Any files with front matter are subject to processing. For each of these files, Jekyll makes a variety of data available via the Liquid. The following is a reference of the available data:
---
---

<h1>{{ page.name }}</h1>
<h2>{{ page.position }}</h2>

{{ content }}

<h2>Posts</h2>
<ul>
  {% assign filtered_posts = site.posts | where: 'author', page.short_name %} {%
  for post in filtered_posts %}
  <li><a href="{{ post.url }}">{{ post.title }}</a></li>
  {% endfor %}
</ul>
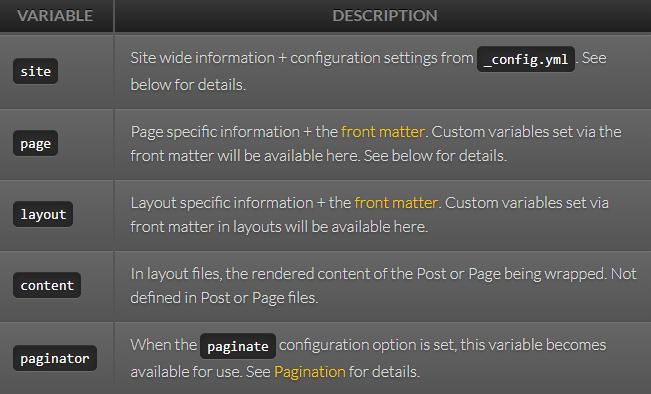
Global Variables
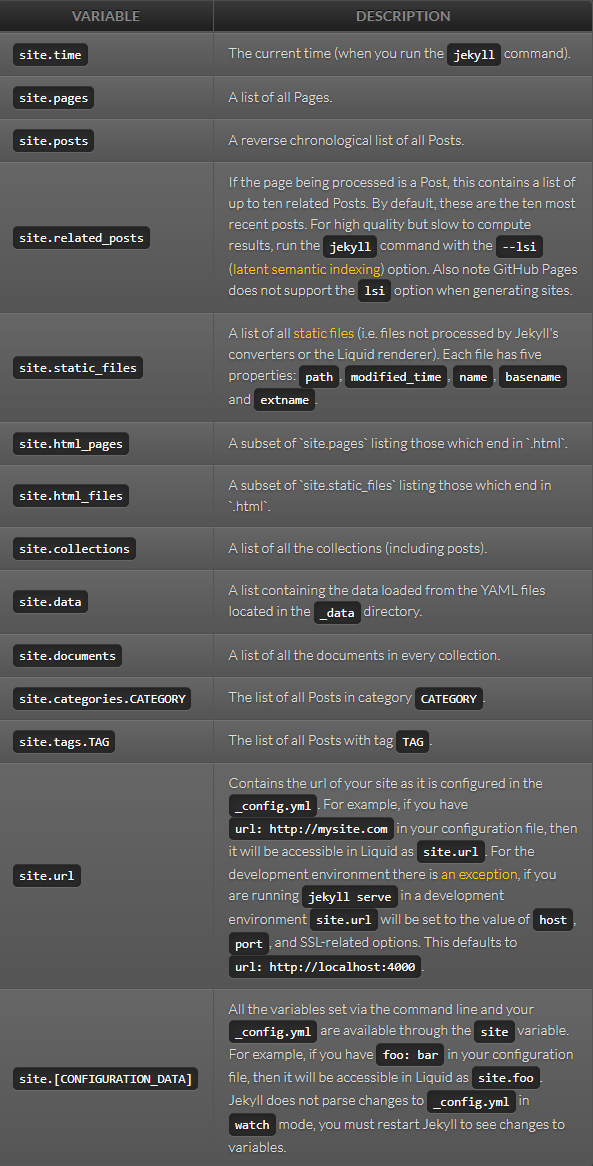
Site Variables
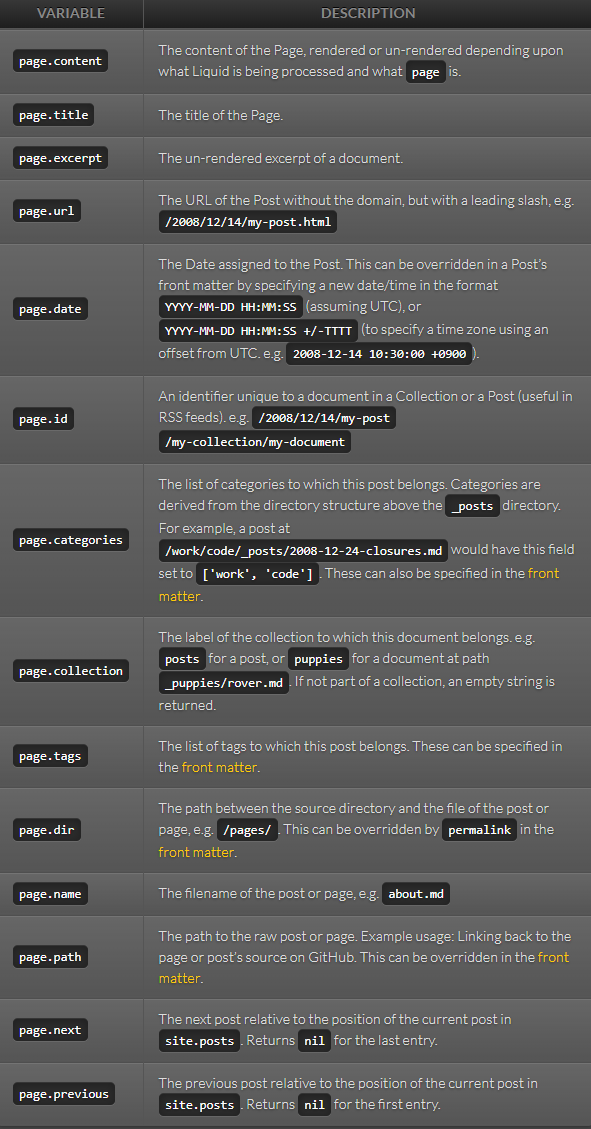
Page Variables
Use Custom Front Matter:
Any custom front matter that you specify will be available under page. For example, if you specify custom_css: true in a page’s front matter, that value will be available as page.custom_css.
If you specify front matter in a layout, access that via layout. For example, if you specify class: full_page in a layout’s front matter, that value will be available as layout.class in the layout and its parents.
Paginator Variables
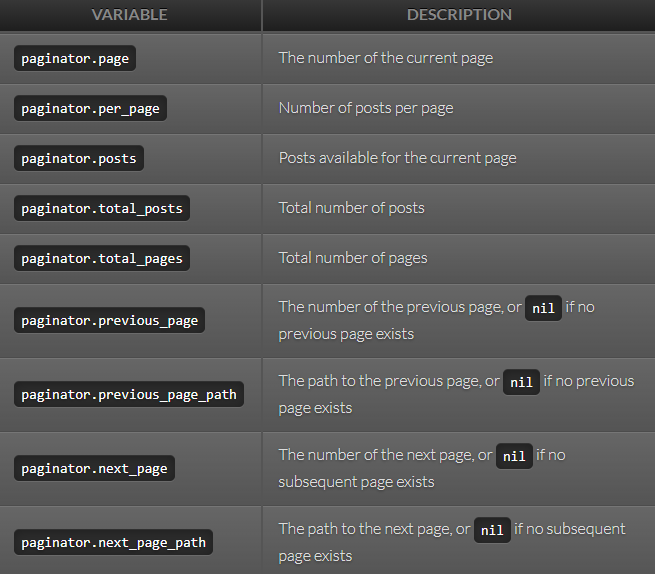
Paginator variable availability:
These are only available in index files, however they can be located in a subdirectory, such as /blog/index.html.